
What is a High Fidelity Wireframe? Guide & Examples
What Is a High-Fidelity Wireframe?
A high-fidelity wireframe is a detailed, realistic prototype that closely resembles the final product’s design and functionality, including specific content, imagery, and precise layouts.
Understanding Wireframing
We first need to understand what a wireframe is:
- This term was originally used in architecture and engineering.
- The term ‘wireframe’ describes a basic blueprint outlining the core structure of a product.
- This design approach allowed architectures and engineers to experiment with the overall form and structure of their creations, without getting bogged down by aesthetics.
Wireframing was a popular design approach long before digital products were invented.
History of Digital Wireframing
Here’s how digital designers adopted wireframing:
- CAD (computer-aided design) and CGI (computer-generated imagery) was introduced in the late ’70s and early ’80s.
- CAD and CGI enabled designers to quickly create and test design configurations in virtual environments.
- In the 1990s, wireframing was adopted in professional website and software design processes.
- Designers used wireframes to visualize their products.
- Digital wireframes illustrate the core structure of a web page or app screen.
- They focus on functionality and layout, not visual details.
High-fidelity wireframes take this last step a bit further:
- They feature realistic text content (not placeholder text) accurately sized layouts, typography, colors, images, and interactive elements
- They include accurately sized UI elements (based on the target device)
- They allow users to better understand the design’s information architecture and user flows
- They provide a highly realistic representation of the final product
Why do high-fidelity wireframes closely resemble the product’s final design and reflect its main user interaction possibilities? To answer that, we need to explore the concept of “fidelity:”
What Does Fidelity Mean?
The term ‘fidelity’ in design refers to the level of detail and realism present in a design prototype or mockup:
- This concept is borrowed from the audio-engineering industry
- In audio engineering ‘high fidelity’ and ‘low fidelity’ describe the quality of sound reproduction
- Digital designers use the same terms – hi-fi and lo-fi to describe the visual detail and interactivity of their design assets
On one end, you have low-fidelity digital wireframes. On the other, high-fidelity.
Low-Fidelity (Lo-Fi) Wireframes
Low-fidelity wireframes are the most basic, ground-level representations of a digital product’s design:
- They are created with simple tools and components like paper sketches, placeholder text, and generic images
- They are ‘early-stage wireframes’ and they only provide an initial glimpse of the product’s layout and structure
- They do not feature user flows or polished visuals
The simplicity of lo-fi wireframes allows designers to test their design ideas rapidly. However, the lack of high-fidelity elements makes them less suitable for user testing as the project progresses.
- You cannot share lo-fi wireframes when stakeholders demand to see how the final design is shaping up
- You cannot share lo-fi wireframes in usability tests
That is why, as the project progresses, the fidelity spectrum shifts towards higher levels of detail and realism.
The Fidelity Spectrum
The fidelity spectrum ranges from low to high:
- Paper sketches are gradually replaced by better-drawn sketches.
- The sketches are replaced by digital scans
- The digital scans are replaced by more detailed digital wireframes
- The visually detailed digital wireframes are replaced by interactive wireframes
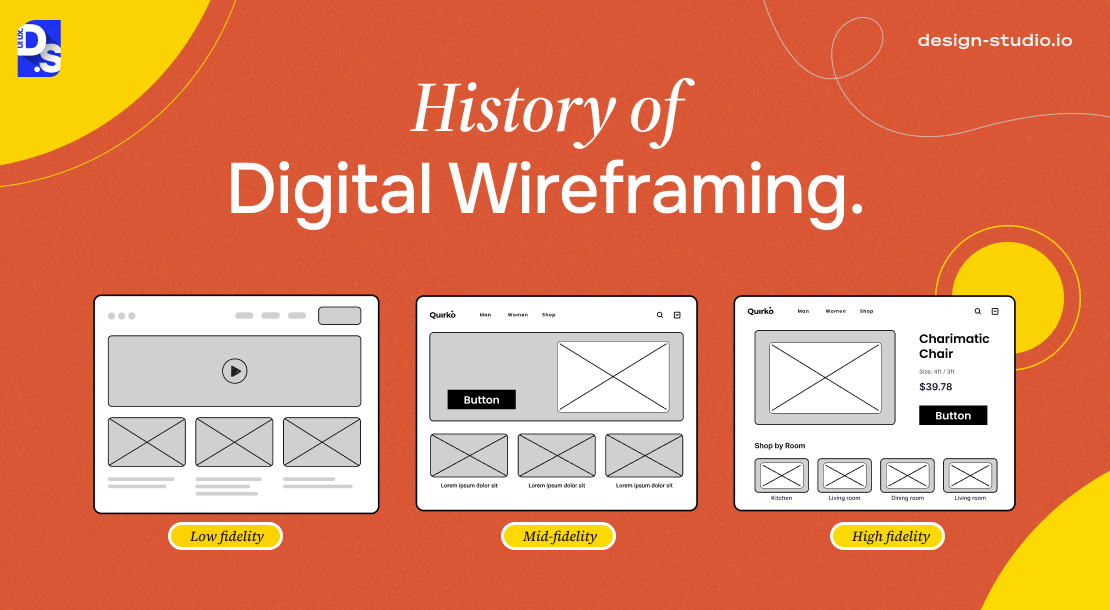
This natural progression of wireframing is represented in three categories:
- Low-Fidelity Wireframes: Black and white wireframes with basic outlines and placeholder text.
- Medium-Fidelity Wireframes: Also known as Mid fidelity wireframes, Slightly detailed layouts with basic color schemes and sample text that reflect the overall structure and content hierarchy.
- High-Fidelity Wireframes: Highly detailed layouts text that perfectly reflects the product’s design structure and content hierarchy with realistic content, polished visuals, and interactive elements.
High-Fidelity Wireframes
High-fidelity wireframes are the final result of the wireframing process:
- They feature highly realistic representations of the design’s visual hierarchy
- They explain the placement of all user interface elements
- They also have basic interactive functionalities that explain the main user flows
These features combine to closely resemble the final design.
Why Use High-Fidelity Wireframes?
High-fidelity wireframes serve as a solid foundation for user testing:
- Users and stakeholders can freely interact with a prototype that closely resembles the final product
- The high level of detail allows them to better visualize the final product and provide more meaningful feedback
- Their interactive nature allows for effective usability testing with real users
- They also provide a detailed blueprint for the development team
- They ensure clarity in the final, design implementation phase
Designers can create more iterative and feedback-oriented workflows by using high-fidelity wireframes.
When to Use a High-Fidelity Wireframe?
High-fidelity wireframes are powerful tools throughout the design process:
When You Need Enhanced Visualization
- The high level of detail in hi-fi wireframes gives stakeholders and clients a clear overview of the final design
- Users can also understand how the final product will function and look
- This clarity helps create a shared vision among team members and clients
- It reduces the chances of misunderstandings later in the project
When everyone is on the same page with a high-fi wireframe, it leads to more successful design outcomes.
When You Need Meaningful Feedback
- The detail in high-fi wireframes makes it easier for stakeholders to provide specific, actionable insights as feedback
- By iterating on their work based on this feedback, the team can address real design issues early
- This proactive approach saves time and resources
It also helps designers ensure that the final product aligns perfectly with stakeholder or investor expectations.
When You Need to Perform User Testing
- Designers can gather valuable feedback by presenting hi-fi wireframes to potential users
- This testing helps identify real usability issues that low or medium-fi wireframes would not reveal
- By understanding how users interact with the near-final design, designers can make targeted adjustments to the UX
User testing with high-fi wireframes is an extremely effective way of detecting the unmet needs and preferences of target users.
When You Need Improved Collaboration
- High-fidelity wireframes act as a common platform for designers, developers, and other team members
- Their clear visual representation facilitates effective communication among team members
- When everyone can see the same detailed wireframe, it reduces the chances of misinterpretation
- Designers can explain their ideas more clearly
- Developers can understand the intended functionality of user flows and design decisions better
- This collaborative environment fosters teamwork
High-fidelity wireframes are powerful tools throughout the design process:
- Strategically incorporate high-fidelity wireframes at the right stages of the design process
- Measurably improve your design’s usability after each round of testing
Let us learn how to create these amazing user-testing tools. Before that, let us recap the major differences between low and high-fidelity wireframes.
What Are the Differences Between High Fidelity and Low Wireframes?

This chart breaks down the key differences between hi-fi and lo-fi wireframes:
| Point of Difference | Low-Fidelity Wireframes | High-Fidelity Wireframes |
| When is It Used? | Early Exploration: Low-fidelity wireframes come in earlyThey are quick to create and modifyThey are ideal for iterating on design conceptsUse them when you are brainstorming ideasUse them to gather initial feedback | Refining the Design: Hi-fi wireframes take center stage later on in the design processUse them to perfect the design’s finer detailsUse them to refine the user flows, and visual detailsUse them for in-depth usability testingUse them to transition to the final design process |
| Focus | Function First: Low-fi wireframes establish a basic design structureThey do not feature aesthetic or visual elementsThey only spark discussions about future design choices | Content and Experience: Hi-fi wireframes help designers finalize:Content placementVisual hierarchyUser flows |
| Complexity & Detail | Low Detail, High Concept: Low-fi wireframes are low on detailThey are conceptual in natureThey often use placeholders for text and imagesIterating or editing them is very easy | Highly Detailed, Realistic View: Hi-fi wireframes boast a high level of detailThey feature realistic colors, fonts, images, and iconsThey give an accurate representation of the design’s final layoutThey give a clear idea of the product’s UX |
| Interface | Focuses on Layout, Not Looks: No attempt to replicate the final User Interface’s visual styleThe only purpose is to convey the initial UI layout | Looks and Feels Like the Real Thing: Hi-fi wireframe UIs feature realistic buttonsThey explain the user flows that activate when you press each UI element |
| Interactivity | No Interaction: No interactive elements | Interactive Experience: Often feature clickable menusAn added layer of interactivity provides a more immersive UXRealistic user experiences are vital for pre-development, design testing |
| Feedback & Testing | Basic Feedback Framework: Perfect for trying out different design ideasNot suitable for usability testing | Meaningful Feedback and Advanced Testing High-fi wireframes are used in:Usability testingIn-person or remote user testingUI component testingA/B testingHeuristic evaluationAccessibility testingEye-tracking studies |
| Handoff to Developer | Starting Point, Needs Extensive Interpretation: Not of any major use to the development team | Clear Blueprint for Development: Function as a comprehensive blueprint for the development team |
Understand these differences and select the appropriate wireframe type for each stage of your design process.
Step-By-Step Process of Creating a High-Fidelity Wireframe
The process and the specific steps for creating hi-fi wireframes will vary depending on the design tool you use. But, the core steps are usually the same. Let us assume that we’re building a hi-fi wireframe for an e-commerce website from scratch:
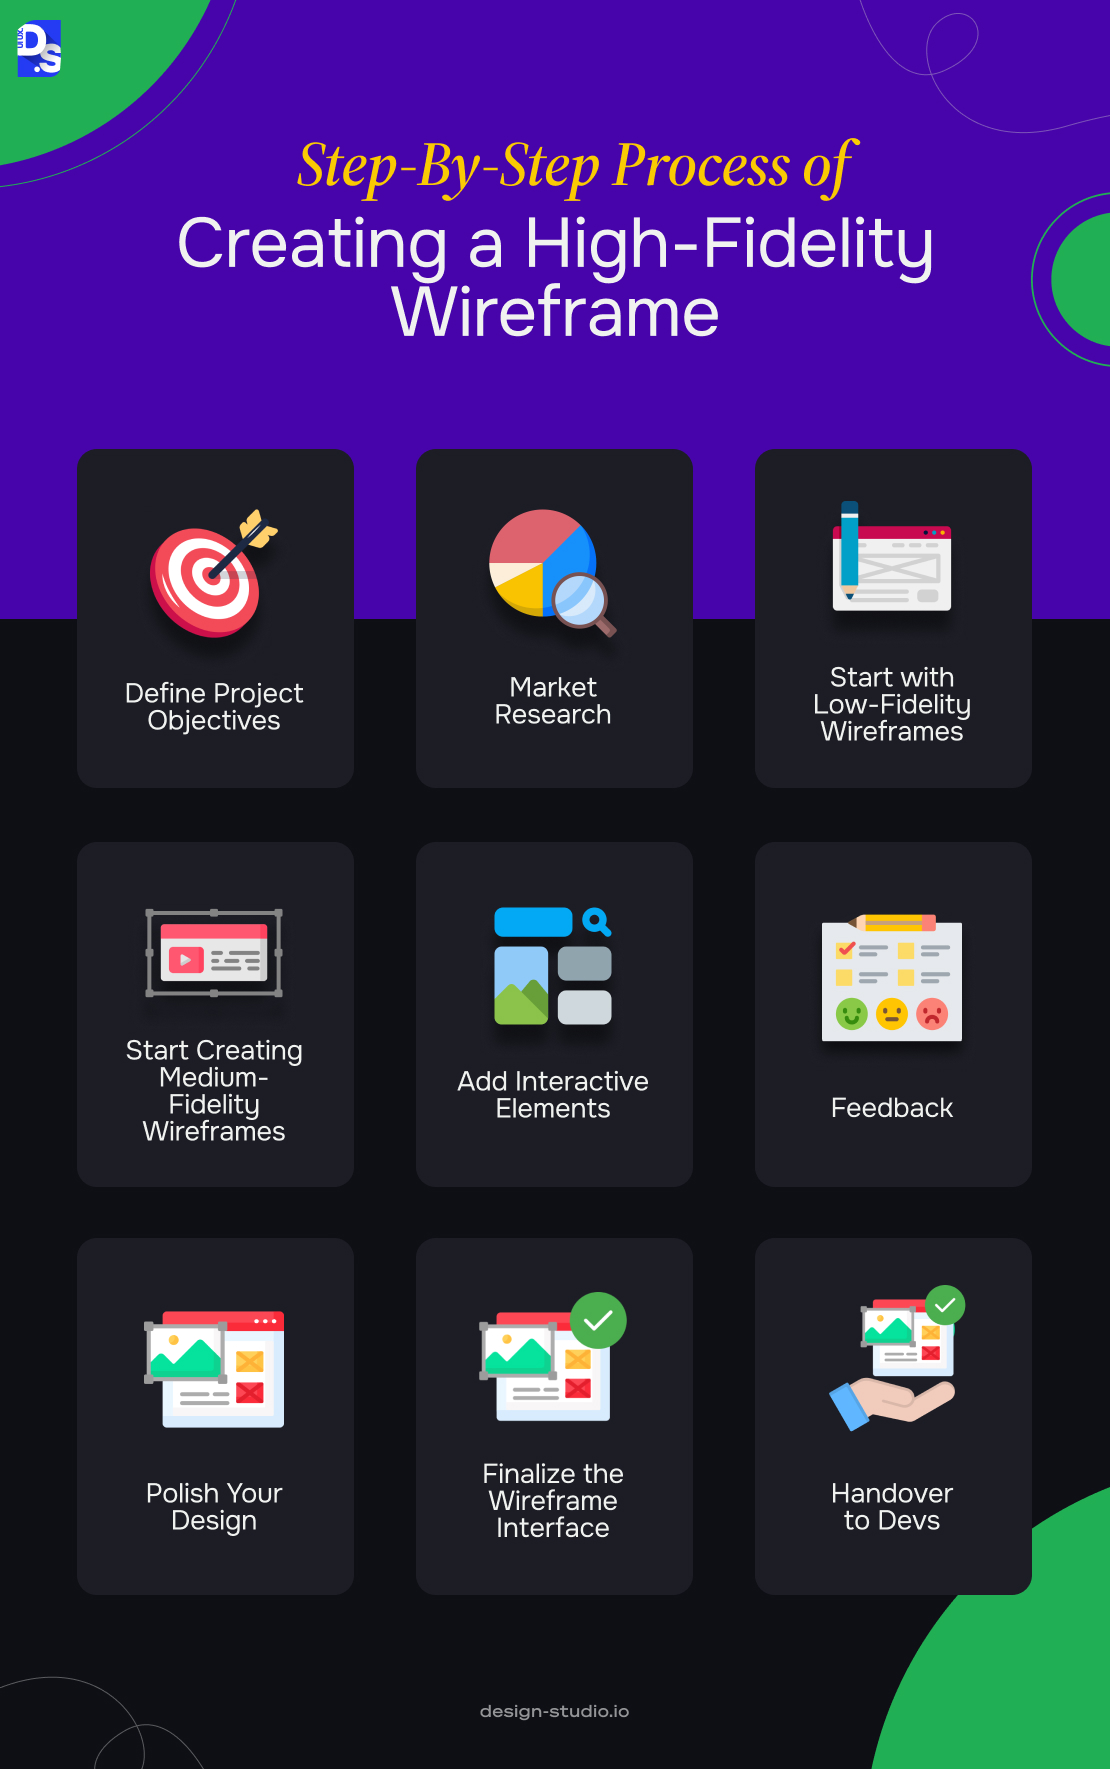
1. Define Project Objectives
- Collaborate with the client to clearly define project goals and success metrics
- Identify the target audience and their needs through user research
- Ensure design objectives align with the client’s business requirements and brand identity
- Document the objectives to maintain focus throughout the process
2. Conduct Market Research
- Analyze competitor e-commerce websites to identify best practices and areas for improvement
- Gather insights about the target audience through surveys, interviews, and data analysis
- Learn from competitors’ designs and user experience approaches
- Refine the project’s value proposition and design strategy based on research findings
3. Conduct Stakeholder Interviews
- Interview the client to discuss the type of assistance needed
- Educate them on your design process
- Set expectations
- Discuss all project needs
- Document all instructions from the clients to guide the wireframing and design processes
4. Create User Personas
- Work with the client to define the primary user groups that will visit the website
- Create fictional profiles representing typical users, including details like age, location, interests, and motivations
- Use these personas to keep the target audience in mind throughout the design process
5. Weigh and Prioritize Features
- Compile a master list of potential features based on client input, competitive analysis, and user personas
- Evaluate each feature using the Feature Reality Test criteria
- Buildable: Can the development team realistically implement it with available resources?
- Usable: Will users find it valuable and easy to use?
- Valuable: Does it support the client’s goals and enhance the user experience?
- Refine the feature set by removing features that do not meet the criteria
- Focus on those that add real value
6. Create a Site Map
- Develop a site map that shows how all the pages connect and support user tasks
- Use the site map to identify the main navigation paths
- Make sure there’s a logical flow between all pages
7. Wireframe Pages and Content
- Sketch initial layouts of each page based on the site map
- Focus on basic details like the placement of content and main design elements
- Use low-fidelity wireframing tools to define the layout
- Iterate and refine the wireframes with the client to ensure they meet project goals
8. Develop High-Fidelity Wireframes
- Use wireframing tools like Balsamiq and UXPin to create highly polished wireframes
- Add realistic content, colors, and interactive elements to the wireframe
- Use tools like Figma, Sketch, and Adobe XD to increase their fidelity
- Simulate user interactions to allow for effective usability testing
9. Gather Feedback
- Present the high-fidelity wireframes to users and stakeholders for feedback on the design and functionality
- Conduct usability testing to evaluate the wireframes’ effectiveness
- Iterate based on the insights collected during testing and feedback sessions
10. Finalize the Wireframe
- Engage with the client and team for a final review of the wireframe
- Obtain approvals from stakeholders before moving on to the visual design phase
11. Prepare for Development Handoff
- Provide detailed notes on each UI element, user flows, and design decisions
- Include information on typography, colors, and other design assets to guide the developers
- Establish limits on the number of revision requests
12. Ongoing Communication
- Keep the client informed about each step
- Build open lines of communication with developers for ongoing feedback and adjustments
By following this step-by-step guide, you create a test-ready, hi-fi, e-commerce website wireframe in no time!
Conclusion
Hi-fi wireframes are awesome. They bridge the gap between:
- That initial “wouldn’t it be cool if…” design idea
- And, your product’s final design!
Think of them as ultra-realistic previews. At Design Studio, we are all for ultra-realistic previews. High-fidelity wireframes are part of every project we oversee! For inspiration, take a look at some wireframing examples that showcase how ideas transform into polished designs.
comments
Add comment